On The Fly
"Fly tying is a school from which we never graduate"
TYING NEWS
The Southern Oregon Fly Tiers met Wednesday, October
11th at the library in Gold Hill. There was a fly raffle and tying
demonstrations by several talented members. We encourage novice and
experienced tiers alike to drop by for a fun evening. A lot of valuable
information will be exchanged, and there is no fee. Next meeting will be
on November 8th when we will continue the popular fly exchange. Join us
the second Wednesday of each month for more fun and the sharing of the
art.
Several local tiers attended the Northern
California Council FFF Conclave held in Redding, October 6-7. This year
several tiers were invited to demonstrate their skills at this informative
event. There were casting clinics, demonstrations, seminars, vendors, old
friendships to be renewed, and more information that a person can digest
in two days.
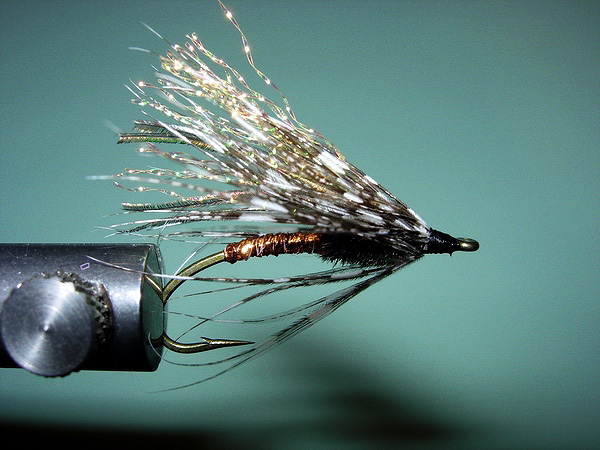 PATTERN OF THE MONTH - Copper Herniator
Hook: TMC
200R or equal, size
#4-14.
Thread: Black
6/0.
Thorax: Peacock
Herl.
Abdomen: Copper
Braid.
Underwing: Four Peacock herl
tips.
Overwing: Copper
Flashabou.
Hackle: Guinea
Tying Instructions:
1) Start the thread two
eye-lengths behind the eye. This is the thread base for the body material
and marker for the hackle tie-in point. Wind a thread base back to just
between the barb and the point of the hook.
2) Tie in the copper braid
at the front of the thorax and bind it down the full length of the thorax
and abdomen to the end of the thread base. Now, wind the thread forward to
the halfway point.
3) Wrap the braid forward in tight, close turns to
cover the abdomen area. Stop at the hanging thread, then bind off-trim the
braid. Now, wrap the thread forward to the tie-in point.
4) Select four
good fluffy Peacock herls and bind them down on the top of the shank back
to the base of the abdomen.
5) Take one turn of Peacock herls over the
top of the shank then wind the herls two turns counterclockwise around the
hanging thread.
6) Pinch the herls and thread together and wind it
forward in tight turns to just behind the thread tie-in point. Bind off
the herls and trim them.
7) Tie in what’s left of the four herls at the
front of the thorax, then tie in about 16 strands of copper flash at this
same point. Bind off and then trim the butt ends of the herls and flash to
about the hook bend.
8) Tie in a guinea feather, with barbs long enough
to reach the hook bend, and make two wraps. Bind off, trim, form a neat
head, whip finish and cement.
The Copper Herniator is a color variation of the
popular and effective fly originated by Bill Geise for the Klamath and
Trinity Rivers of Northern California. The original was tied with peacock
colored braid and crystal flash. It was named the Herniator because Geise
was admitted to the hospital with a hernia the day after the fly was first
used. He claimed it was due to the strain of catching so many big
steelhead on the new fly.
Variations include size,
color and addition of a bead head. When targeting half-pounders, you
should drop down to size #10-12. Try many of the new braids made in green,
bronze, and purple to change the effectiveness in different light and
water conditions. Try your local fabric shop for a good selection of
colors. Add bead head in gold or copper to drop the fly quickly or fish
deeper in faster water. Even though there are several steps listed, this
is a relatively easy tie. So tie some up, give them a test drive locally
or in Northern California, and let me know how you do.
TYING TIPS
Proportions and angles are
very important on this pattern. To achieve the proper angle for both
wings, you need to form a “ramp” with thread wraps when tying off the herl
thorax. You can also tie back on the material to make slight angle
corrections. This method is especially effective when applying hackle
collars on other steelhead flies. Peacock herl is a proven killer material
but very fragile. By winding the herl around the thread you can add
durability. By coming over the top of the shank first and winding it
counterclockwise around the thread before you wrap, the thread naturally
keeps the herl snug. Vary the number of crystal flash strands.
Tie One On,
Dan Kellogg (you can contact me at
FLYGUY@EZNORTHWEST.COM)